 |
| 6 litres of warm water in a bowl, rubber gloves, a measuring jug with 500ml of warm water, damp shorts, dye and 250g of salt |
I've been making some dip dye shorts whenever the weather is nice enough, since I want to make them outside, it kind of needs to not rain! It's simple enough to do and really fun! I want to experiment with more dye and more shorts! Above is a photo of what you need, and I'll list the steps below. Also just to be careful wear old clothes you don't mind getting stained, but I've done this twice now and haven't stained any of my old clothes, but knowing how clumsy I am I won't take the risk of wearing my usual clothes!
I followed the instructions on the back of the dye packet except for weighing my material, I've just dipped two pairs of shorts into the dye and it's worked. I also dipped the shorts into water and squeezed the excess water out so that they were damp before I started, but I will be using a spray bottle in the future.. For step one you need to add the dye to 500ml of warm water. I used an old measuring jug so it doesn't matter if it stains and mixed the dye in using my hand and a rubber glove but you could probably use a spoon or something else instead.
Step two needs you to add the 250g of salt to the 6 litres of warm water and mix in till it gets nice and cloudy.
For step three you then add in the dye.
I mixed in the dye using my rubber gloved hand for step four and it was a nice bright pink.
For step five you then add in the shorts however far you want the dye to go. I put in two pairs of shorts, one pair I'd already dip dyed purple, and a plain white one I'll dip dye another colour. Some people use hangers, I have before for a longer bucket, but this time I just draped it over the edges.
Then you just wait for one hour for step six. You're meant to stir regularly but I haven't. I will stir next time though just to see the difference if there is any.
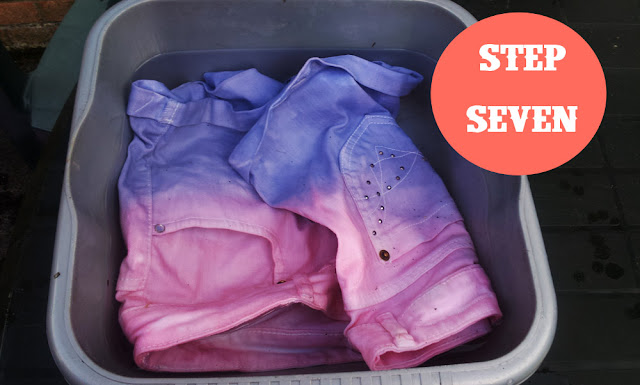
After the allotted time, for step seven rinse the shorts in cold water and wring dry. You're also meant to wash in warm water but I'll do that after I've dyed my other shorts and do them all at once.
After you've washed them (which I didn't do - yet) hang them somewhere or put them somewhere safe to dry. It says to keep them away from direct heat and sunglight, so I put them on the washing line when the sun was going in and they did start to dry before it rained! So then I popped them on an old towel and put them in the bath to dry overnight!
I hope that was helpful for you, and the last photo is how one pair of shorts has turned out. I like it, but it is a bit creased and crumpled in that picture so it does look nicer in person, as it was wet at the time. I can't wait till I've done my other shorts (I bought three dyes so that's three colour combos) and then stud them!


These look amazing! I love that they are do-it-yourself too, makes them individual :) I just wish I was brave enough to wear short shorts! xx
ReplyDeletejensbrightandbeautiful.blogspot.com
Thanks! I think I might be a little bit addicted to it, but I have to wait for sunny days which limits me doing it!
DeleteAh I'm actually making them as a bit of a summer project shop idea I have, since my legs are terrible atm! Covered in bruises and cuts but hopefully by the time its sunny again they'll look better lol
Lisamello xx
I love the colours you chose. Perfect for a festival or sunny holiday
ReplyDeleteThanks, it took me ages to decide on the colours! And it would be nice if the weather was sunny for people to wear shorts too!
DeleteLisamello xx